Thursday, 11 August 2016

August at Scrapabilly #1

The latest Scrapabilly Kit des Monats is now available featuring Party Time by Echo Park!

Here it is for you to take a peek. There are lots of party and birthday themed items but as you'll see from my pages, there's so much more to lift from the wonderfully bright colours and fun patterns.


Today I'm sharing two layouts from the five I made and hope to share the others in the next few days.

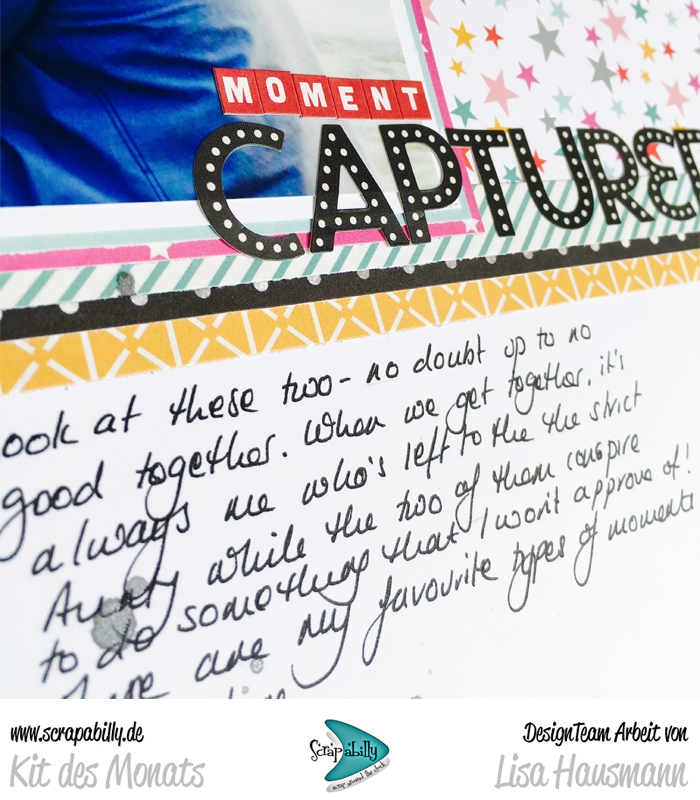
This multi-coloured star paper has silver stars and it was just too cute to cut up too small! So I made a feature of it and matched it up with other star papers and a few branding strips.

This photo warms my heart! Our niece just adores her uncle - he's the soft touch for sure!


I used silver mist to match the silver stars to add some detail to this very simple page.


The black letters were great to make a statement title and I loved the way they really stood out from the busier background.


Can you see those silver stars? This paper had my name on it!


And another sheet that I just couldn't cut up due to the wonderfully pretty bokeh patterns. Instead, I just used it as a full background sheet and kept my elements to one part of the page so that most of the paper can still be seen.


Another page, another niece! And this is the only birthday layout I made using the kit. But the birthday stickers were cute and I really wanted to find a use for them. I don't record every birthday but as we'd FaceTime'd on this evening, I thought the photos would be fun to bring together in this way.


I decided to use some stitching to add some dimension, texture and extra detail.


Cute, huh?!?


Check out the kit here on the Scrapabilly site and don't forget to check out the Design Team gallery here while you're there. I love looking at the gallery to see all the different ideas we've come up with. You can also find the Schnick Schnack Sack (embellishments) and the Pretty Planner Pack kits and galleries there too. So much to discover and so much inspiration to be had.

Back soon with more shares!

Thursday, 4 August 2016

Forgeries on the Fourth

As you know, I bow to the Queen of Forgery, MF Leslie who inspires and impresses me each and every month. And now there's Princess of Forgery, MF Lesley too! They are both fabulous at coming up with original ideas of how to replicate items from the inspiration kit to fill our own.

This month, as I had picked out the kit to counterfeit, I thought it would be appropriate for me to have a go at one or two items myself.

There are loads of ideas over at the Counterfeit Kit Challenge blog today so do make sure you check all those out too.

The Papier Werkstatt kit included a bag and I knew that I wanted to give that a go. A few years ago I made a whole bunch of little gift wrap bags for Advent and this time around, I wanted to use to scrapbooking paper. I decided to go outside of my kit and even outside of the inspiration of the kit and looked through my supplies of 12x12 papers for some that are less likely to be used for actually scrapbooking. I still like them, but maybe not enough to put them on a page - I know you all have some of those!!!

These were the handful I picked out. And of course, right away I messed up that first sheet and ended up throwing it out :-(


Anyway, to begin with I looked on Pinterest and searched under the terms: craft, gift, bag. There were loads to choose from and I've linked a couple over at the Counterfeit Kit Challenge blog. I followed the instructions for this one and then decided to come up with a template for my own that would be folded in such a way that they could be stored flat.

Here we go - let's see how well I can explain this!

First of all, I took a sheet of 12x12 paper that comes in page protectors that I use to back layouts or for things like this and decided the vertical fold lines for my bag which then determined how much I needed at the bottom and the top to use the whole 12x12.

This is the template and the lines and numbers are score and fold lines.


I then used this to score and fold a full sheet of BasicGrey paper here


 After folding all the lines as shown you then need to bring the two ends together on the vertical and stick them together. I used double sided tape as it needs to be quite strong.


After refolding the sides, I then folded the top in on itself. You don't need to stick this as the ribbons will hold it together and I decided not to reinforce it so I won't be able to put a heavy gift inside. Just to note.


Then you have to press the whole bag flat again to work the bottom section.


This is complicated to explain but you need to match the vertical fold lines below the bottom score line in so that they lie flat along the bottom fold line and then press the sides into a diagonal line. I hope you can tell what I mean from this photo below!


And again, you need to fold along the remaining (side) fold lines so that there are two flaps that overlap each other to form the flat bottom of the bag. Again, secure well with tape. If you need to, you could also cut a piece of card to reinforce the bottom of the bag from the inside.


After adhering the flaps, it should look like this!


I then used my Cropodile to make hole about 1/2" from the top (I used the smaller hole) and threaded ribbon through for my handles.


This pink bag uses exactly one piece of 12x12 and makes a bag which is approx 10" high, 4 1/4" wide and 1 1/2" deep.

The bag with the large spots was made shorter by cutting 4" off the height of the paper at the beginning and making the top reinforcing fold about 3/4". The third bag at the back follows that original tutorial I found on Pinterest (here).

While a 12" paper won't make a large gift bag, I can imagine using up some of those "difficult to use but difficult to throw away" sheets to make some more bags and it uses ribbon too which I always forget - so double win!

I also had another go at the print and cut feature of my Silhouette Cameo. I wasn't sure about the embellishment pack from Pebbles but it looked to me as if some of the die-cuts were actually printed vellum so I thought I'd have a go at my own. I could see doilies, hearts and flowers so I went through my Silhouette library and picked out some similar shapes. Printing on vellum needs patience because the paint doesn't dry very fast and I needed to use my heat gun in the end. And then the Cameo couldn't find the registration points and my manual input appeared a little out which meant that some of the shapes didn't cut well. But the few that I ended up with are super cute and perfect for adding into my kit. You could achieve the same effect by stamping and manual die-cutting (some manufacturers offer sets for exactly this type of effect) or even stamping and then fussy cutting the shapes yourself. Vellum is great to use in clusters and layers that it's definitely worth the effort of trying this technique out I think :-)


Don't forget to head over to the Counterfeit Kit Challenge for more forging ideas and link up anything you made on our Link Up page. We love to see your own forgeries!

There are details at the end of every Counterfeit Kit Challenge blog posts on how to join in the fun

Monday, 1 August 2016

Counterfeit Kit Challenge August Kit Reveal blog hop

Wow, it's August! Glad to have you back here today and welcome to the Counterfeit Kit Challenge reveal blog hop. 

You should have arrived here via Leslie's incredible Blue Box reveal and Lynnette, with her fantastic staging is up next. The full list is at the end of the post in case you get lost along the way. And don't forget to check out Karen Lai, aka Pinky Crafter  our wonderful Guest Designer. She's awesome and I'm so happy she's with us this month. 

It was my turn to pick out the inspiration kit and set the challenges in August and I wanted to pick a European kit as I definitely think that scrapping is a little different this side of the ocean. Of course, it would have been wonderful to pick out Scrapabilly but I knew it would be fair to pick another kit provider. I went with the Papier Werkstatt and their gorgeous March 2016 kit.

I loved the softer tones of this kit which is a great contrast to the brighter summer kits we've had the last few months. And I think the colours are still very much reminiscent of lazy beach days and gentle meadow picnics.

The Papier Werkstatt and their gorgeous March 2016 kit


There are more photos and a full kit list over at the Papier Werkstatt site but I pinned all the kit items to a Pinterest board to help the non-German speakers among you! If you'd like to check it out, you can find it here. In addition to the pinned items, the kit contains a sheet of hand-made paper, some neutral cardstock, a piece of thick felt and the ring mechanism for a mini book.

And here's my take.


I broke my own 2016 kit rules for this one as the original kit was so lovely and I wanted to include all the patterns featured. So I took each paper and found a "match" in my own stash for both the a and and b-sides which means 10 sheets of paper. But hey, they're my rules and therefore I can break them!

And of course, nearly all my papers are double sided too (and often with more colour on the other side) so I will have lots of possibilities.


The original set of Thickers is one of my favourites of which I have four or five partial sets. Time to finish off some of them perhaps. Every kit I make needs both small and large letters so Mini Market stickers continue the neutral theme. More may be added as I go along.


Instead of the individual items for making a mini-book, I included a pre-made base. I don't really "do" minis so let's see if I'm inspired!


And then I packed my kit with some embellies. The items I picked out to match the inspiration kit  die-cuts was a sheet of chipboard die-cuts from My Mind's Eye. They are from the same collection as the two sheets of floral paper - Market Street I think.  Several of the designs reminded me of the pieces in the original kit and I struggle to use chipboard so I'm challenging myself to get these lovely items onto pages.


Then I added in some fun bits and pieces that seems to match the feeling of the inspiration - veneer pieces, clips, twine, washi and some doilies which pick up the doilies in the embellishment pack of the inspiration kit.


The kit is larger than I've made the last few months and I'm ok with that. I will use some of it during August and then it will go on the shelf to dive into as and when I'm inspired. I don't feel the need to complete the kit within the current month and like the variety of working with more than one kit at any time.

When I looked at all the pieces together, it seemed to sum up holidays in the mountains and originally, I wanted to call my kit something countryside related or even Heidi. And then I realised that the floral elements and natural wood veneer pieces and the neutral tones made me think of mountain meadows. Alpine it is then!

Thanks for dropping by. If you'd like to join us this month, head back to the Counterfeit Kit Challenge blog where you will find details of how to join in and make the most of your kit.

Here's the full blog hop list in case you get lost along the way.

Sunday, 24 July 2016

Counterfeit Kit Challenge July member blog hop

Welcome to the July member blog hop over at the Counterfeit Kit Challenge - great to see you again. 

It's a small hop today but chock full of inspiration all the same so make sure you catch everyone. I'm right at the end so if you missed anyone along the way, why not head back to the Counterfeit Kit Challenge to start at the beginning. The full hop list is at the end of this post.

This month, Susanne challenged us with the following prompts...

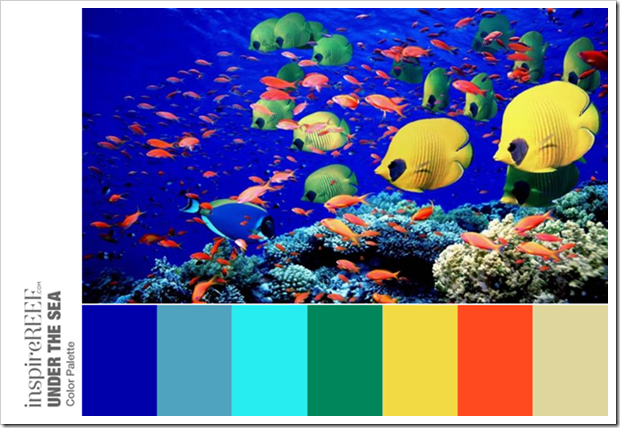
... and I went with the "Cool Waters in Hot Weather" with this inspiring photo


Even though we encourage you to use this month's kit up with the current challenges, you might know that I often have older kits still hanging around, and am happy to go back and use them up as and when I'm inspired to do so.

My November 2015 kit, Remembrancewas the kit that just kept giving! I made 12 layouts which is an amazing number and then realised that I still had quite some scraps. It was time to kill the kit. I looked at what I had and realised that they matched the colours in the challenge photo but that they were all somewhat muted and softer. But if you look closely you can find blue, teal, aqua, green, yellow, orange and sand! Who would have thought that this pastel focused kit could provide papers that match the tropical photo here!

I made up this layout:


Thanks for dropping by today - don't forget to let me know you were here!

Here's the full hop list in case you missed anyone and there's a new kit and oodles of inspiration coming in just a few days over at the Counterfeit Kit Challenge. We'd love to see you there :-)

SaveSave

Saturday, 16 July 2016

16 loves {July 2016}

Welcome to the next in the series {16 loves} for 2016.

For the last few years, I've been sharing my loves each month - a little bit of everything that has caught my eye or been enjoyed over the last month. So, a new year and new inspiration. I hope you will come back each month to see if there is anything in my list to inspire you. 

To see what's inspired me in the past, click to find all my {13 loves}, my {14 loves}, my {15 loves} and my {16 loves}.

I hope there's something in here to inspire you or maybe just make you smile.


one

My Counterfeit Kit Challenge July kit, Scooped, is one that I just love. I made a layout a few days ago that doesn't look anything like this photo (b-sides) but that's the joy of my kits. I hardly do any scrapbooking without a kit these days!


two

On 29th June, I travelled down to Cologne... THIS never fails to take my breath away. The Cologne Cathedral must be one of the most beautiful anywhere. Love it.


three

The reason I was in Cologne was to meet up with fellow Master Forger, Julene! What a thrill to get to know someone from the opposite corner of the world! We had a fun few hours together while I showed her and her friend around some of the main sights before before we had lunch, including a glass of the infamous Kölsch. So great to meet her.


four

She came bearing gifts. So sweet of her and that bright pink, butterfly printed scarf has my name all over it.


five

I have to get myself a jar of this. Just so delicious - pepper marinated in salt. 


six

There's a discussion going on in the Master Forger FB group about blogging and how it seems to be going out of fashion. For several of us, that seemed sad. I don't get around blogs as much as I'd like to recently and when I do, I tend to binge read and comment, but I do love seeing and reading a bit more in a blog post than over on Instagram (as much as I love IG!). 

S at Snaps and Snippets is one of my favourite stops when I have time, and she never fails to make me smile when I do. 

Snaps and Snippets here

seven


I spent a weekend in the German town of Worms (pronounced Vorms!) and it has an incredible Romanesque St Peter's Cathedral complete with later redesigned Baroque alter and choir. Impressive for such a small town. This is the site of the Edict of Worms - where Luther was declared a heretic. So much history, you could literally feel it when you walked in. 


eight

And the surrounding villages have pretty sights such as this. I'm planning to go down again to drive around to some of the many, many vineyards you can find in the area. 


nine

Another winning collection by Shimelle, Go Now Go. I love travel themed products - which is ironic now that I don't travel as much as I used to! - and this one looks like a great mix of designs, colours and elements. Everyone's going crazy for the puffy heart stickers but I just love the overall look and feel of this. I hope that I'll be able to get my hands on it when it comes out.

Shimelle for American Crafts - Go Now go

ten

This Moonlight collection by Kesi'Art was a no-brainer for me. I just had to order it. I love it. Look at those constellations and moon designs. 


eleven

Not really something that's inspiring me. Rather something that's making me mad. Brexit happened. Unexpected by all. The UK's future is somewhat uncertain. My response? A glass of wine and some time to reflect.


twelve

I have lovely students! At the end of a set of lessons, one group made the trek to the local English shop in Dortmund to pick up some British supplies for me - shortbread, orange marmalade, tea, a copy of OK! and of course, a Union Jack. The gesture touched me greatly.


thirteen

The Scrapbilly kit in July was full of Carta Bella Beach Day products and as soon as I saw the pineapple paper, brad and washi tape, I knew that I had to make this page at last for the Whimsical Musings WM#167 prompt. 


fourteen

I had some fun preparing a batch of flair for something special - and secret - ...


fifteen

... which then found their way into the post and across the miles...


sixteen

As I write this, it's the 15th, which marks my 15th anniversary of moving to Germany. A selfie was called for and the page to mark this milestone will be made. I feel like I've aged a 100 years since I first arrived but I am very much at home here and love it. 


Ilove you to share your own {16 loves} lists with me. Why not link up in the comments below?


{16 loves} is a series that will feature on my blog each 16th of the month

LinkWithin

Related Posts Plugin for WordPress, Blogger...