Showing posts with label embellishments. Show all posts

Monday, 4 November 2019

November 2019 - Counterfeit Kit Challenge - Forgery on the Fourth

A reminder of the Counterfeit Kit Challenge November inspiration kit from Scrapdelight Scrapwinkel in the Netherlands. I am truly in love with this kit and am so happy that I picked it out for us this month.

https://www.scrapdelight.nl/product/67860/123-documenter-kit-pocket-pages-winter-thema/

I decided that I wanted to focus on the pretty fairy lights for my forgeries as well as what seemed to be really simple coffee cups and a "winter" word. It all seemed pretty easy and could be found in my Silhouette files.

Easier said than done for this Silhouette novice - even after 7 years and much increased use!

I searched my own files, then looked in the Silhouette store and came up with a good sample of full width banners and some shorter ones as well as a set of light chains which looked pretty close to the original. Then I went on the search for coffee cups and a word. So far so good.

I managed to work out how to create an offset cut for the word so that I could cut the original word out in blue and add it to a white background. I was on a roll! Then I worked out that I would need to make the coffee cup lids and hearts on a second sheet in different colours. Again, looking good.

The final light chain that looked so similar to the original also had separate shapes for the lights and the strings to be cut out in different colours. Ok, they also needed to be on a different cutting mat. I mirrored a couple of the chains so that the swing would be different and filled one sheet to be cut out in white. This was easy!


Then I organised all the bits I wanted to cut out in colour on another sheet - positioning them to match up where I intended to put different coloured scraps of paper. I was trying to make it easy after all and didn't want to have to load up the cutting sheet a gazillion times with different bits of paper.

My Silhouette layout looked something like this!


And my sheet of paper looked like this with the different scraps taking up different locations matching up to what my final layout was (I changed the previous layout a bit once I had the papers picked out). All the little bits of coloured paper came from my kit which I thought was quite clever.


However, every time I sent the file to cut, the paper slipped around and didn't cut properly. Even though I had refreshed the glue on the cutting mat and pressed the paper down really really hard! It drove me crazy. I was achieving one or two of the tiny things with each pass before the paper started to shift around. I was at it for HOURS!

This morning, I sat down with fresh energy and a clearer head and decided to send each shape through separately and attach the papers to the cutting mat with a little washi. Worked a dream!

I used a glue pen to do the fiddly work of adding the tiny pieces onto the white shapes. I'm not designed for this type of detailed work - I just don't have the patience. But even so, I'm pleased with the result of how they turned out - if you don't look too closely!


I lost the dot to the "i" along the way. I'll have to draw it in I think!


And the little lights are so tiny that I just picked them up and stuck them down as well as I could. Now I see that some of them are textured and some not - ah! Textured cardstock which I'm not used to using these days - oh well. As always, live and learn!


However, all in all, these die cuts will be useful I'm sure and you'll have to see what I do with them. I don't have anything specific planned, but the month is still young...

I've added some free cut file links over at the Counterfeit Kit Challenger blog today so head over there to check out what the others have created as well as the links.

Don't forget that there's a whole load of inspiration over at the Counterfeit Kit Challenge blog and we always love seeing how you've been inspired. So please share your kits and projects with us.

You can use our Monthly Link-up page, post them in our Facebook Community, or share them on Instagram (we are @counterfeitkitchallenge or tag us using #counterfeitkitchallenge and #ckcnovember2019).

Wednesday, 4 September 2019

Counterfeit Kit Challenge - Forgery on the Fourth

I'm back today with my Forgery on the Fourth for Counterfeit Kit Challenge September kit.

You can find out more links and other forgeries from the team over at the Counterfeit Kit Challenge blog here so don't forget to head over there to see what's on offer :-) 

A reminder of our personalised curated kit for September's inspiration courtesy of Khristina Sorge from the Secret Not Secret Kit Club (you can find details about her club online here) who is also our wonderful Guest Designer this month. 

This is the kit she made for us.


My eye immediately went to the die cut viewfinders and the outline plane embellishment. I knew I could come up with something similar using my Silhouette. It took me a couple of minutes to find some viewfinders in my library so I was on a roll but a plane? I had to use a cluster embellishment and ungroup them to have a single plane to use.

Next up was to resize a bunch of them, position them in a similar way to the original in the kit and then work out how to connect them. Merging them was tricky and it took a long time to get them perfectly positioned so that they touched but didn't go "into" the neighbouring shape. While that looked ok as block shapes, once I worked out how to create an outline shape, I could see that when they overlapped too much, the outline wasn't solid but rather had openings where they touched. I went online to find out how to create an outline cut from a solid shape (apparently it's offset and I worked out that an inside offset was better). Then I kept nudging the shapes around, merging, offsetting and checking the form before undoing all those last steps to nudge the shapes around again and continue through that iterative process until I was relatively happy with the result! It's not perfect but I'm happy with it and I think that no-one would notice the imperfection. This is a screenshot of how my template looked in Silhouette before I sent it to cut.

I used a thick white cardstock and it came out perfectly. It really took a long time but I learned about offsetting shapes and am gradually building up more than just the basic skills that I've had for some time now. When I use my Silhouette, I'm always thrilled with the result and just purchasing this shape might have been a whole lot easier but I've got a lot of satisfaction from creating this die cut myself.


I also thought I'd give the epoxy stickers a go. I liked the simple white on black form with the non-uniform white outline and thought I could recreate something similar. I used an almost black paper and them white heat embossed some motifs from a travel collection stamp set and a few phrases that were the same as the original set. I cut these out using three different sized dies and then cut a set of white cardstock circles too. I mounted the black paper onto the white cardstock in different ways - sometimes using a larger white circle and sometimes, the same size. I moved the shapes around so that there was a different frame of white on each one.


Then I covered a few of them with Mod Podge Dimensional Magic, laying them out on baking paper first so that they didn't stick. I tried to get right up to the edges and knock out the air bubbles before leaving them for 24 hours to dry.


The final result isn't perfect as there were definitely some bubbles still left in the glue as well as some rough edges as the glue settled and dried. I was also a little disappointed that the white cardstock appears less than white now. The Dimensional Magic is not 100% clear but at least the white of the cardstock is now the same white as the embossing!


Just for comparison, I also did the same thing to a few with Glossy Accents. As you can see, the white cardstock appears a more true white but the surface is certainly not as smooth and glossy or as dimensional.


I've left a few without the "epoxy" effect and no doubt all my faux epoxy stickers will get used up on cards at some point.

If you have some clear epoxy stickers, you can of course make your stickers in an easier way than this. I've included a YouTube link over on the CKC blog today for different ways to put your backgrounds together for these.

In the past I've also talked about making complete copies of sets of word-based Thickers using my Silhouette (you can find examples here and here).

Why not try your hand at making your own embellishments for your own kit? It can be a lot of fun learning new techniques and trying different things out to achieve the results you're looking for. Not all of my "forgeries" are successful, but I love giving it a try!

Don't forget that there's a whole load of inspiration over at the Counterfeit Kit Challenge blog and we always love seeing how you've been inspired. So please share your kits and projects with us.

You can use our Monthly Link-up page, post them in our Facebook Community, or share them on Instagram (we are @counterfeitkitchallenge or tag us using #counterfeitkitchallenge and #ckcseptember2019).
Saturday, 4 November 2017

Forgery on the Fourth - November 2017


It seems that all my attempts at Forgeries on the Fourth are very often rather hit and miss and this month was no exception!

I decided I wanted to make my own cork embellishments because those featured in the inspiration Citrus Twist kit were so lovely and I certainly don't have anything like that in my stash.

The cork elements here on the left are really very pretty!

So I started off by finding some cork tags in my stash and collected together some supplies to have a go at my own. A few stamps from my very limited collection and I wondered about paint, ink or even embossing.


To begin with I tried stamping with paint. Er, not so good! Paint too thick? Stamp too delicate? User error? Probably all three to be honest and not a complete disaster but maybe there is a better way.


I fished out a sheet of thin cork and die cut a whole bunch of circles in different sizes. I know that I can use these on my pages just as they are as I've done this before and I really like the effect but I wanted to give stamping and embossing a go.


I have a white Stamping' Up ink pad and I have to say that this was totally unsuccessful - there really was nothing to see. Back to the drawing board again. My embossing pad was not really wet enough and that proved to be a big problem and again, I had no luck.

So I got myself an embossing pad refill and added some to my pad. This gave a nice wet stamp onto the cork and the embossing powder stuck nicely to it.

I embossed some in white and really liked the effect - not really a perfect finish but I found that I liked it as it seems to match the rougher surface of the cork.


I decided to try some other embossing powders and there is definitely a difference depending on which one you used. A no-name pink powder didn't show up at all, and a gold powder was too coarse. The copper was the best by far and it also helped that I used a more solid design stamp which turned out really well.


So now I have a small pile of decorated and non decorated dots to sprinkle on my layouts!

What will you make for your own kit this month? I do hope that you share your makes with us. You can do this by using the Link-Up page here on the blog, posting in the Counterfeit Kit Challenge Facebook Community Group or on Instagram (find us @counterfeitchallenge and share with #counterfeitchallenge ).

Saturday, 4 March 2017

Forgeries on the Fourth

Welcome to the March Counterfeit Kit Challenge Forgeries on the Fourth.


I'm trying to be a more creative with my kits this year and part of that is getting back into a bit more counterfeiting. Once I've got an idea in my head and get to work trying to make that a reality, it's a lot of fun and even the fails make me smile. I love seeing how I can improve my creations though changing the process in small ways! 

And this one was no different. 

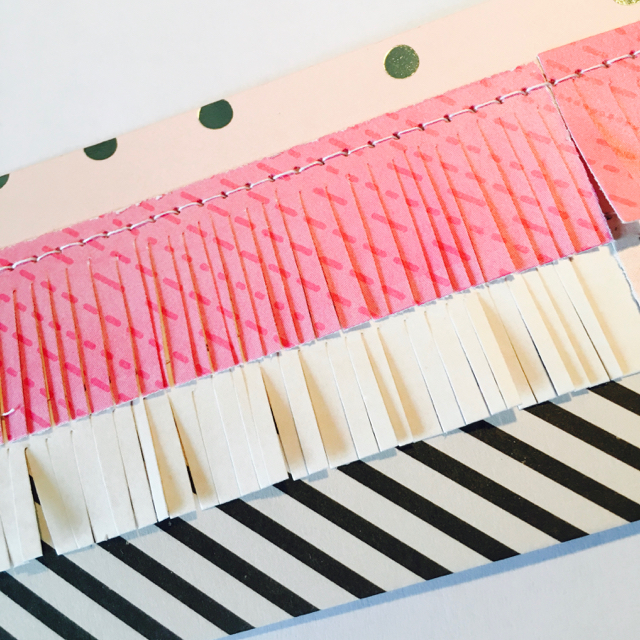
I looked at the original inspiration kit and decided that the oversized fringed Maggie Holmes butterflies might be a possibility to forge and looked up some more detailed shots online so I could get an idea of how they were constructed. It was a little difficult to see exactly how each stripe of patterned paper was attached and the dimensions so I just gave it a go and came up with a very rough first version. In fact, it was so rough that I didn't even get the sewing machine out and just grabbed my tiny attacher. Definitely a first draft...


Lots of room for improvement there. I looked at the originals again and decided to make more than one line of fringing. And the sewing machine was dragged out. Now this one was almost even more of a failure as the stitching was way way way too small and it almost worked like a cut line and the top of the wing even fell off! I taped it back on! You can see here that the middle section of fringing falls off due to the shape of the butterfly so in the end, I adhered some strips back in the middle and you can see the (bit) better iteration in the photo at the end of the post where I show you all 6 butterflies that I made.


Ok, learning from a lot of mistakes, I decided to give it another go and started off but taking a piece of patterned paper as the background, then attaching broader strips of paper overlapping more so that they could be seen under the fringing - if you know what I mean! This looked much better as a starting point. I stitched both the yellow and the pink dotty paper onto the background before cutting the fringes - carefully. Much better.


But somehow the final result was still a bit lacking. The middle section lost the fringing once again and the sides of the wings have also suffered a little too. Perhaps the original designs had more adhesive behind the fringing?


Difficult to know for sure about some of the details that didn't work so brilliantly for me but I decided to gave one more set of ideas a try and went for the final iteration (#4).

Once again, I started off with a strip of background paper (black and white) at 2 1/2" and then adhered the next layer right over the top. I just glued about 1/2 of the way at the back of this paper (pale pink) so that I would still be able to cut the fringing after I was done. I was using up scraps for these butterflies which is why you can see two parts of the pink paper here but I simply used each side for one butterfly.


Then I glued a small strip along the top and stitched the pale pink paper so that there would be enough space below to cut the fringing.


Here you can see that I judged the level of the stitching to be roughly where the indent would be in the butterfly wings so that less fringing would drop off.


The brighter pink paper was then glued down - about 1/3 of the way down.

And then stitched.

Fringing was next and I just used my finer, pointed scissors to cut up to the stitching line on both layers. I had to push through the glued area a little but once the cuts were done, I could just press them back down which felt like a more secure way of dealing with the problem of the small strips being cut off.


I had cut out a template for the butterfly and when I placed it over the paper, I could see that I would need to cut it a little longer so that all four strips could be seen. I also needed to be more careful in that centre top section that I didn't cut all the way through the secured area so that those little strips didn't fall off as they had on other iterations.


You can see how I cut it a little longer and that centre section is much less deep into the pink paper.


And here's my final version which is so so so much better that that first one. Four different methods to get to this result! My little butterfly bodies aren't perfect but they add to the slightly imperfect effect of the butterflies in general.


Here are all six of my butterflies and you can see that the bottom two are a LOT better than the top two for example. Practice makes perfect. I'm sure if you were more careful with the butterfly template shape that you could make them even better but I'm happy with the results and will probably use them on cards or tags rather than on my pages for an added bit of whimsy.


These butterflies are not exactly part of my Counterfeit Kit Challenge kit this month but who said that you couldn't just forge something from the inspiration kit, just for fun? I'll be back in a couple of days to share my kit - I'm on the mini-kit team in March and was really excited to give the smaller format a go. I feel really inspired and am looking forward to sharing.

Don't forget that we love it when you share your own kits, creations or even forgeries and now there are even more ways to do that. You can link up from your own blog or our Flicker group on the Monthly Link-up Page over at the CKC blog. Or you can join our brand new Facebook Counterfeit Kit Challenge Community Group and share directly in the group. We hope that you will share and chat and find new friends over there too!

Tuesday, 4 October 2016

Forgeries on the Fourth


There were many items in the Counterfeit Kit Challenge inspiration kit, Indigo Hills by Pinkfresh Studio, that could have been "forged" and I decided to go for the gorgeous tassels included in the collection. How useful they will actually be on pages has yet to be established because they are quite bulky but I just couldn't resist their prettiness or their colour!


First of all, I collected some products. I had plenty of white embroidery thread and decided that I would use that for the main body of each tassel rather than the different colours in the originals. However, I did have normal sewing thread in each of the five other colours so I felt that was enough of a match.

I started by looping some of the white thread so that it would be longer than double the length of the final tassel and then I started by wrapping the first, middle colour of sewing thread around the centre of this bunch and pulling it tight. In this way, the top of the tassel is really firm.


When I had wrapped what felt like the right amount according to the picture of the original, I then started the second colour to the left of centre, ensuring that the ends slightly overlapped each other to give a smooth transition from one colour to the next. I wrapped that until it looked about the right size compared to the original - there was a lot of guessing in this process!


This colour was then added to the other side too. Finally, I added the second of the side colours - gold.


Once the top loop had the three colours, all that needed to be done was to double this over in the middle so that both sides were the same and the blocks of colour matched up. Then the fourth colour of thread was wrapped around the base of this loop. This needed to be tightly wrapped too so that the loop is held in place.


This was how it looked when I had finished the wrapping of the threads. It felt like it was going to take a long time and the initial stages were a bit fiddly but I think that each one of these tassels only took about 10 minutes once I had established the size, colour and technique.


All that was needed then was to trim the ends of the white thread to give the full tassel effect. The smaller tassel here was my first, test make and I have to say that I think I got the size better than the next ones I made. But these are hand-made after all and I probably won't put more than one tassel on a project at once and wouldn't notice the size even if I did!


Here are the set of four using each of the four colours in the different parts of the binding process. I've just realised that I'm missing the little ring on the top so that they can be attached to layouts and projects more easily so I will try to get around to adding that on when I track some down.


I love the colours from the original Indigo Hills items and think the combination of pink, aqua, yellow and navy works so well. When I put my kit, Lucid, together I had already made up the tassels some weeks earlier. So I put the tassels out on the papers to make sure that I picked out the right shades for my version of the kit. I found this a great way to quickly pick out items for my kit so I might try to remember that technique again for the future.

Thanks for dropping by today! Let me know you were here and which item from the original kit you're planning to forge!

Don't forget that we love it when you join in and make up your own kits. Share your kit and your creations over at our Link-Up page and don't forget the Member Blog Hop on the 24th. 

***** MEMBER BLOG HOP ***** 


Find out how below!  
Go on, you know you want to! 
Your project should be something new, using a Counterfeit Kit Challenge kit, that you haven't shown before and will only post for the hop. Be inspired by any of the challenges this month or just share something you've created with your kit. Remember, the more the merrier and it never fails to be a lot of fun! 
To be a part of our blog hop: 

  • E-mail us your name & blog address & promise to participate at thecounterfeitkitchallengeblog@gmail.com by the 18th October.
  • You will receive an e-mail from us by the 20th October with a list of the hop participants.
  • You will need to schedule your own blog post showing your project based on a challenge and link to the person after you in the hop.All Blog Hop posts will need to be scheduled to go live on the 24th October at 12:00am Mountain Standard Time (Arizona) but we will help you with the scheduling

LinkWithin

Related Posts Plugin for WordPress, Blogger...