
Welcome to the March Counterfeit Kit Challenge Forgeries on the Fourth.

I'm trying to be a more creative with my kits this year and part of that is getting back into a bit more counterfeiting. Once I've got an idea in my head and get to work trying to make that a reality, it's a lot of fun and even the fails make me smile. I love seeing how I can improve my creations though changing the process in small ways!
And this one was no different.
I looked at the original inspiration kit and decided that the oversized fringed Maggie Holmes butterflies might be a possibility to forge and looked up some more detailed shots online so I could get an idea of how they were constructed. It was a little difficult to see exactly how each stripe of patterned paper was attached and the dimensions so I just gave it a go and came up with a very rough first version. In fact, it was so rough that I didn't even get the sewing machine out and just grabbed my tiny attacher. Definitely a first draft...

Lots of room for improvement there. I looked at the originals again and decided to make more than one line of fringing. And the sewing machine was dragged out. Now this one was almost even more of a failure as the stitching was way way way too small and it almost worked like a cut line and the top of the wing even fell off! I taped it back on! You can see here that the middle section of fringing falls off due to the shape of the butterfly so in the end, I adhered some strips back in the middle and you can see the (bit) better iteration in the photo at the end of the post where I show you all 6 butterflies that I made.

Ok, learning from a lot of mistakes, I decided to give it another go and started off but taking a piece of patterned paper as the background, then attaching broader strips of paper overlapping more so that they could be seen under the fringing - if you know what I mean! This looked much better as a starting point. I stitched both the yellow and the pink dotty paper onto the background before cutting the fringes - carefully. Much better.

But somehow the final result was still a bit lacking. The middle section lost the fringing once again and the sides of the wings have also suffered a little too. Perhaps the original designs had more adhesive behind the fringing?


Difficult to know for sure about some of the details that didn't work so brilliantly for me but I decided to gave one more set of ideas a try and went for the final iteration (#4).
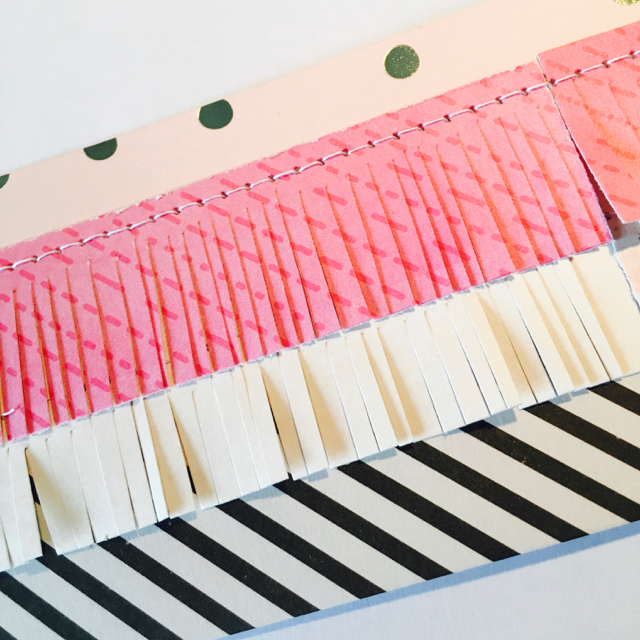
Once again, I started off with a strip of background paper (black and white) at 2 1/2" and then adhered the next layer right over the top. I just glued about 1/2 of the way at the back of this paper (pale pink) so that I would still be able to cut the fringing after I was done. I was using up scraps for these butterflies which is why you can see two parts of the pink paper here but I simply used each side for one butterfly.

Then I glued a small strip along the top and stitched the pale pink paper so that there would be enough space below to cut the fringing.

Here you can see that I judged the level of the stitching to be roughly where the indent would be in the butterfly wings so that less fringing would drop off.

The brighter pink paper was then glued down - about 1/3 of the way down.

And then stitched.

Fringing was next and I just used my finer, pointed scissors to cut up to the stitching line on both layers. I had to push through the glued area a little but once the cuts were done, I could just press them back down which felt like a more secure way of dealing with the problem of the small strips being cut off.
I had cut out a template for the butterfly and when I placed it over the paper, I could see that I would need to cut it a little longer so that all four strips could be seen. I also needed to be more careful in that centre top section that I didn't cut all the way through the secured area so that those little strips didn't fall off as they had on other iterations.

You can see how I cut it a little longer and that centre section is much less deep into the pink paper.


And here's my final version which is so so so much better that that first one. Four different methods to get to this result! My little butterfly bodies aren't perfect but they add to the slightly imperfect effect of the butterflies in general.

Here are all six of my butterflies and you can see that the bottom two are a LOT better than the top two for example. Practice makes perfect. I'm sure if you were more careful with the butterfly template shape that you could make them even better but I'm happy with the results and will probably use them on cards or tags rather than on my pages for an added bit of whimsy.


These butterflies are not exactly part of my Counterfeit Kit Challenge kit this month but who said that you couldn't just forge something from the inspiration kit, just for fun? I'll be back in a couple of days to share my kit - I'm on the mini-kit team in March and was really excited to give the smaller format a go. I feel really inspired and am looking forward to sharing.
Don't forget that we love it when you share your own kits, creations or even forgeries and now there are even more ways to do that. You can link up from your own blog or our Flicker group on the Monthly Link-up Page over at the CKC blog. Or you can join our brand new Facebook Counterfeit Kit Challenge Community Group and share directly in the group. We hope that you will share and chat and find new friends over there too!

Wonderful tutorial. So great to see the process of how to figure out something instead of giving up. They are so cute!
ReplyDeleteEveryone of your little creatures is perfectly wonderful.
ReplyDeleteThese are fantastic.
ReplyDeleteWhen I saw the kit I thought the butterflies would be the perfect item to forge.
Your's turned out absolutely gorgeous.
These are great.
ReplyDeleteI even love your mistakes.
Wow! I'm impressed!
ReplyDeleteWow I agree I think these turned out great :)
ReplyDeleteOh my that's lots of work, but the result is totally fantastic.
ReplyDeleteGreat tutorial! I think I would have given up after the third try as I'm not too patient but your perseverance really paid off!
ReplyDeleteSuch strength and determination to keep going and experiment! And a great result ... Though I do like those very first ones you did - the colour and pattern palette which is so pretty.
ReplyDeleteWhat a struggle, but they turned out just fine.
ReplyDelete