Wednesday 30 May 2012

Finishing up kits

LOAD uses stash. Full stop. Counterfeit Kit Challenge uses stash. Full stop.

Combine the two and you have a whole load (no pun intended) of stash being used up. Insert *SMILE* here!

So far this month, I've made more than 20 of my daily layouts for LOAD using my March, April or May Counterfeit kits and it's way too much work to calculate just how much that is, but I'm sure you can imagine all that stash, cut up, glued down and used up.

So over the next week or so, I thought I'd share some of those daily layouts with you to show you how versatile these kits can be.

Starting off with March's Soothe kit.


I've already shared a grand total of 8 layouts from this kit with you but I have three more. I am amazed that I managed to get so many layouts from one single kit - especially one with such a limited colour scheme. I did add in more cardstock towards the end and if I'd tried really hard, I'm sure I could have squeezed one more out (I had included a 6x6 BasicGrey pad that was still quite full) but there IS a limit!

As I dipped into it over the last few weeks, I noticed one or two things being left out again and again and as I dismantled the kit, these went into my recycling bag for my niece who is 4 and delighted to be able to play with pretty paper!

The one thing that disturbs me at the end of the kits is usually the alphabet and this was no different. The clumsy adaptation of letters on this layout bothers me but the layout itself is one I like so I'm going to have to try to ignore those dodgy letters! Do you ever rework layouts? Can you past things like this?


Then there was one bright piece of cardstock left and I challenged myself to use it. It's less orange IRL and the contrast of the blue and metal against it works quite well but these bright backgrounds are less my thing these days. I like the way that the kits help me to really pin down what works for me and what doesn't but as long as I have a whole holder full of coloured cardstock, I'm going to have to work my way through it.


And here's one from back at the beginning of May that I'd made for Whimsical Musings #37 which was to be inspired by questionnaires. I had found this list of prompt words online and they seemed perfect for my 24 hours at the beach which was just what I'd needed.


While these three layouts are similar in tone, I think that the kit proved incredibly versatile at giving me different looks and feels to the layouts I created. I would never have imagined that I would have loved this kit as much as I did. But I did :-)

Have you had a kit that surprised you as much as this?

Tuesday 29 May 2012

A little blog love

Last week,fellow Master Forger Jemma over at Just Jimjams kindly gave me a blog award! She said some lovely things about me and I was blushing but delighted at the same time.


You should go over to her blog and say hi to her too as she creates some amazing stuff with her Counterfeit kits and has a great writing voice - I'm always interested by her take on things. Her post about the Liebster blog award for example includes a fun calculation about how many blogs have felt the love! Check it out here.

The idea behind the Liebster award is to spread the love and let your favourite small bloggers (less than 200 followers) know that you read them and enjoy them so much that you want to recommend them to your own readers. It's all about being part of the community as far as I can see.

So, I'm sending some love to (in alphabetical order):


If you are trying to be a big kinder to the Earth while still crafting your heart out, you need to got and say hello to Danielle at EcoScrapbook. As well as being an über-funky scrapbooker and crafter, she is gently teaching us all about how we can combine our love of craft and paper with being environmentally conscious. There's a lot of projects, challenges and information over at her blog and she's always updating us with which manufacturers are the greenest. I've learnt such a lot there and I'm sure you will too.


My Stamping Guru and maker of all things gorgeous, Deb over at A World Of Imagination. She is truly an incredible source of inspiration from scrapbooking through card making, stamping through crochet, photography through to seemingly whatever she turns her hand to. She is such a lovely person and is always so generous with her time and help. Her blog is the epitome of blog candy for sure.

Of course, no blog love fest would be complete without shouting out some internet love to my Whimsical Musings partner in crime, the ever delightful Pam (find her at Daily Pamage). She's just the cutest thing and our friendship has grown and grown over the last year to the point that hardly a day goes by without some kind of positive communication between us. She is more than just a scrapbooker, she seems to be able to create just about anything (although I *think* food might not be her strong point ;-)  ) and is a joy to have in my life. A favourite blog read and a very special friend.

Fellow LOADster, Master Forger and BPC participant, S over at Snaps and Snippets, is a fun place to stop at every day. She has a sanguine (to use one of her own words) way of looking at the world and I often find myself laughing out loud while reading her posts. She is a great scrapbooker and a lover of colour which combines into some wonderful pages. She also runs a challenge of her own "In Good Company" where she encourages us to familiarise ourselves once more with our stash, picking out one manufacturer a month to focus on, scrap with and share. If you, like the rest of us, have a lot - uh-hum - of stash hiding out in your scrap space, then join in on the fun. S has hinted she might stop the series which would be a shame but I'm sure a few more entries would keep it going :-)

And last but by no means least is a relatively new blogger and scrapper who has been joining in the Counterfeit Kit Challenge since February, Tricia at Playing With Paper. I've been loving her layouts and you will too. She has a lovely delicate scrapping style with lots of white space, beautiful layering and just an all round gorgeous design. Even though my style is very different, I am inspired by her blog and her pages whenever I drop by.


So, let's look at the rules to check that I'm being a good girl...


1. Thank the person who gave the award √
2. Link back to their blog √
3. Post the award onto your own blog √
4. Choose 5 new recipients with fewer than 200 followers √
5. Let each of them know about the award 


Thanks again to Jemma and now it's time for you to go over and check these blogs out. You are in for a treat, I promise you.

Monday 28 May 2012

3-2-1 Go!

The Counterfeit Kit Challenge mini-challenge #3 is up and this time it's all about the numbers.
3
2
1

That would be to use 3 embellishments, 2 pieces of patterned paper and 1 photo.

And it's easier than it looks at first glance.

I have to admit that I had a bit of an advantage here because I'm in the middle of LOAD and every day this month has been challenging us to stretch our creativity and one of the days' prompts was also 3-2-1 so I'd had some practice :-) {here}

And even though I've made quite a few layouts from my May kit Whisper already, there seemed to be plenty of choice in there to make this a relatively fast process.

Completely out of order in my uploading of layouts but this is layout #8 from my May kit, Whispers


With my full, cluttered style the starting point to any challenge like this is to choose double sided papers which gives me 4 designs in effect. And this MME papers, with its ready printed clusters and extra details is also great as it provides embellishments there and then. I also reach for border punches to add extra elements and fussy-cut as much as possible. I "stole" a bit of the background paper from behind the photo and used that with the heart punch as well as the "Follow Your Heart" element from the manufacturer strip at the bottom of the paper. The only tiny bit of cheating I did, and not deliberately, was that small strip of green/white plaid there next to the Follow Your Heart banner. It's also from the manufacturer slip at the bottom of the paper but from another sheet and I didn't realise until I had glued it down :-( Oh well.

My three embellishments are the pearls, one of the pennants I made for the kit, and the washi tape. The photo speaks for itself!

Another thing I love about these MME papers is that there are usually some words included in the printed cluster and I like to try to incorporate those into my title, saving on letters while giving me a longer phrase.

Pretty papers, a cute photo and a few words. It doesn't get much better than that :-)

Sunday 27 May 2012

Mail Art Exchange

The delightful Ginger organised another Mail Art Exchange recently and I was happy to get involved again. It's something a bit different to the usual scrapping that I do and pushes me to try something a bit different.

This time around, the theme was words so I used a whole load of tissue paper, from Starbucks of all places, to cover the envelope I would be sending and then dotted it with words cut from a couple of second hand books as well as some rub ons. I included a butterfly banner made from book pages too which I was particularly delighted with and now need to make myself one too! Of course I forgot to take photos of it but the recipient, Alexa, wrote about it {here}. Alexa has such a wonderful minimal, clean and simple style that I was nervous to be sending her something in my busy, distressed, layered style but to be honest, that is part of what this Mail Art Exchange is all about - giving and receiving art in many different styles.

And then in the first week of May (yes, WAY behind on my posting here) I received my happy mail from Sandie over in the UK.

Now I'm not sure if Sandie knew that I am a Brit living over here with a penchant for a taste of home but her happy mail certainly hit the mark with me! Look what I got.

The set had the most lovely tape measure stamping on it, a really pretty card with such a lovely quote and a gorgeous book mark with a reminder to create. But on the other side, it had paper covered with stamps, the largest of which was a British stamp complete with the Queen. Love it!


With this year being the Queen's Diamond Jubilee, I'm all about the symbolism of home right now and this was just the most lovely gift that now has pride of place in the Queen's biography I'm in the middle of reading. Talk about the perfect combination :-)

Thanks Sandie for a wonderful Mail Art Exchange and once again, thanks too to Ginger for organising it. Looking forward to the next one.

Tuesday 22 May 2012

Counterfeit Kit Challenge #2 - scrapping with fabric

I think I might have mentioned this before, but for someone who used to be consumed by sewing it's strange that I don't have much fabric lying around! When I saw this challenge I had a moment of head scratching before deciding to just go for the overall design and worry about the fabric later.

I decided to see if I could get just one or two more layouts out of my March kit, Soothe and so that determined a more muted colour scheme. Looking through what was left in the kit, I realised that there was not a lot of larger paper pieces (except this grey stripe) but that my 6x6 Periphery paper block was still in there, so that took away another set of decisions.

Another little vellum envelope will keep my journalling safe and a little private when I sit down with some time to think about my words. I wanted to bring in a touch of colour and the last of the mini yellow flowers in my kit seemed perfect. But there was still the problem of the fabric. I thought about making up some flowers or even tearing up a piece of white cotton to back the photo but in the end, went with destroying a grey striped shirt that had been put out for the recycling. I just ruffled it up and added it as a frill under my twine and flower cluster. I like that it's quite subtle but adds some pretty dimension and texture and is in keeping with the rest of the colours in the layout, echoing that grey stripe a little. I adding some lines of stitching to tie in with the fabric which is easier to see irl and chose a contrasting photo to really attract the attention. A little layered butterfly and some pale yellow chevrons left over from a previous layout finished this easy layout off. (I think I should have positioned them a bit more obviously not in a line! It looks a bit like they are supposed to be in line but miss the mark! Oh well, once it's stuck, it's stuck.)


I think I'll be rummaging through that recycling bag, which is overflowing after a bout of wardrobe spring cleaning, to see what other fabric scraps I can work into my stash. There are so many ways of including fabric into the design of the layout that I'd like to think this will become a bit more standard for me. Maybe....

And just to tie up loose ends, this layout is from day 19 of LOAD where we had to repeat something from the day before. I repeated the use of the kit, the butterflies, the 6x6 paper blocks, the white flower, the twine, the colour scheme and the use of vellum! And this is layout #9 from that March kit which is kind of amazing when I think about the fact that it was quite a small kit and quite limited in colours. I've since created one last layout and will share the final couple of pages in the next day or two. A very successful kit!

Saturday 19 May 2012

Scrapbooking day challenge - late but done

You might remember our Scrapbook Day blog hop a few weeks ago {here}. There were some AWESOME challenges listed by my fellow forgers and I've been remiss in getting on board with some of them. BUT, it's not to say that I haven't written them all down and am intending on getting to them sooner or later ;-)

And this is exactly such a layout and the post that goes along with it. Sweet Libeeti encouraged us to get out our stamps and use them on our pages. I have to admit to being terrified of stamping on my layouts! I'm not a good stamper (don't practice enough) and am always worried that I will mess up. Not that I don't mess up in other ways on my pages but that's not the point. But Libeeti gave me a few ideas about how I could include some stamping while taking away the risk. Simple things like stamping an element on to paper or card and cutting it out before adding it to my page rather than stamping directly onto the layout itself. Doh! Light bulb moment!

Well, this month, I deliberately added some stamps into my Counterfeit kit, Whispers, in the hope that it would remind me to use them and hopefully be able to join in (if late) on Libeeti's challenge. While I'm doing LOAD this is the perfect time to participate in one or two that I missed first time around so I kept Libeeti's idea in the back of my head.

And here's the result:

Layout #5 from my kit (I'm blogging them completely out of date - sorry!)


I stamped a selection of leaf images using Tim Holtz Distress Ink - pumice stone onto kraft paper which gave it a subtle effect. And then I used those as part of my embellishment. Love the result and it was a great exercise for me to try out my stamping a bit. I think I stamped more than 10 images to get these five that were ok and not smudged, patchy or clumsy!

And there's that Starbuck's tissue paper again!

Don't feel that just because you are slow joining in on challenge that you give up on it. Whenever you see something you like the sound of, jot it down in your inspiration notebook and then make it when you have time. And don't forget to link up to where you saw the prompt - I know how wonderful it is when someone lets you know they had some fun trying out something you suggested. :-)

Thanks Libeeti for giving me that gentle nudge to give it a go. I adore my layout.

Friday 18 May 2012

Determined to be in good company this time around

I've been a bad challenge blogger of late and have missed several of sweet S's "In Good Company" challenges. Mostly due to lack of good time management. We have ten days to create a page after all, but somehow, I just manage to miss it.


But this time I'm participating in LOAD at the same time which seemed like a good opportunity to get that product fished out and used up! This month's chosen manufacturer is Sassafras which I love and while I don't have much of their stuff, and what I have is several years old now, it was lovely to find it all and get some used. It was perfect for the LOAD 3-2-1 challenge to use three embellishments, two pieces of paper and one photo because their paper is double sided, has those cute borders along the bottom and often has sweet fussy-cutting possibilities. This double challenge proved easier than I thought it would be. Love that. 

I found a photo that I love. Totally adore. But there's not really much story behind it apart from the fact that I love it and that is it exactly the type of photo I try to get when I'm over in the UK. These little ones grow up all too fast while I'm away.


My three embellies were the string, the Buttons and a journalling spot (also Sassafras), then two papers from the Life Is Beautiful range and one gorgeous photo. Creating an element cluster with the cut out elements was perfect for this simple page and the borders just added a touch of something. This isn't one of my favourite layouts but it made me happy to use up some older product and find a place for this photo. It gives me a lump in my throat just looking at it.

So happy to be In Good Company once again. Won't you come along and join in too. You'll be surprised what treasures you can find in your own stash. It's worth finding them and spending some time creating happy pages with them :-)

Thursday 17 May 2012

Creating my Counterfeit kit


When I posted my May Counterfeit, I commented that I would write a post about the process I go through when shopping my own stash to create a kit. And I'm really late with this post. So, I'm sitting here in front of Germany's Next Top Model and have decided to try to get this written up. :-)

1. First of all, we receive the details from the Counterfeit girls about which kit we are counterfeiting this month and I spend a little time looking at the kit online, printing out the photos, looking at the content list and generally getting a "feel" for what the end result needs to look like. 

Here are the print outs I made of the 5 SC kits we were given this month and my first reaction was that the main kit wouldn't be my main focus but that I would probably combine a couple of the smaller kits. Looking at them laid out like this I could see that numbers 2 and 3 appealed to me directly so I put the others to one side and limited myself to these.

The next thing I did was to check out the content list just to see if I had anything matching in my supplies. If I do, it doesn't necessarily mean that I will include it in my kit, but I might take them out as a starting point, taking them out later.

This time around, I had a couple of the MME papers so I put them to one side.

This might sound like a long start up but this is a pretty quick process, the longest bit being checking out the kits online. I'm talking about 15 mins or so in total.


Once again for reference, these are the two kits I selected.

Louvre

Versailles

2. I know several of my fellow forgers find this odd, but my next step is to sort out some cardstock which will form the base colours. I don't really use much coloured card these days but I still have quite a lot in my stash so I see this as an opportunity to get some of it out and hopefully used up. I always add some white, kraft and or cream and then go with some colours. Usually six sheets seems to be a good idea. I pick out my colours and just place them next to the pictures of my selected kits to see if they go. I might take out 10 or 15 different sheets and then just reduce it to 6 or so to get the feel I want. 

Here, I knew I wanted some softer colours especially compared to the previous month's rainbow extravaganza and so I selected white and kraft, then added in a grey, a soft yellow which picked up the woodgrain and yellow stripe of the original kit, then green and a soft pink as a nice complement to the other cardstocks. This way, the softer coloured card would drive the softer colours I wanted to achieve in the kit.


3. Next up is papers. Like I said, I had some of the original kit papers so I put them out and laid them on my desk next to the cardstock and decided that I would use them after all. They seemed to go so well with the colours I'd chosen and looked so good in the original kit that it seemed the right thing to do.

Looking at the inspiration kit, I liked the butterfly paper and just happened to have one from Bo Bunny so out it came. And that drove me to select another sheet of the same range that went with it. There was a yellow spot in the SC kit so I found a soft yellow print from BasicGrey (ages old) and also a lovely greeny design that reminded me of the green in the chevron paper in the Louvre kit. In this way, I had "matched" the four papers in that kit. The Versailles kit started with the two sheets I had (mentioned before) but I didn't have the same woodgrain or floral so I selected a MME wood pattern and went through my stash for a multi-flower design that would contrast but still go with the papers and cardstock I had already chosen. If you look at the photo below, you can see several floral sheets out but none of them are anything like the original kit. But that's ok as I didn't have that strong red contrast from the original so I selected the Crate Paper floral with tones of lilac which brought another colour into the palette and which I thought was rather nice. I dragged out a few more sheets of paper in the process but after laying them next to the pile you see here in the photo, they immediately went back into my stash. 

It's all a matter of taste and feel and variety. I'm not looking (well not often anyway) for a kit that is ONLY a certain limited colour scheme. I want to get a selection of layouts out of my stash that I might not have come up with before so a bit of variety is important for me.

Another main thing for me is to combine new, not so new and most certainly old papers together in every kit. You have to try out the process to see how it works for you.


4. Once I have made my paper selection, I line them up to see how they look together. Here I decided to add in another floral paper to bring out a bit more of the pink


5. Now the main part of the work is done and I can go to town selecting my embellishments. You can guarantee that there will be more in my kit than the original as I know what I'm like with my layers and stuff!

The process starts the same way as with the papers, checking to see if I can match any of the items exactly. In this case I couldn't so I started off my selecting items that were the same type as the inspiration kit. This time around, that meant some twine, some buttons and brads, several alphabets including a white one like the kit and a couple of smaller ones like the BasicGrey sheet in the original. I didn't have a doily mask so I included several normal doilies but matched the mask idea with one out of  my stash, going for a leafy one because of the feel of my papers (with the butterflies and flowers, nature was calling). I pulled out some journalling sheets from a Making Memories book to match the Smash pages and mentally decided to make up some pennant pins like the Maya Road ones (see tutorial here) and some doily envelopes similar to the Martha Stewart ones (see tutorial here). Then I noticed the tissue paper in the SC kit and fished out some recycled tissue paper from Starbucks and decided that I had to find a way to use that too. 

The original kit had a few stamps and I'm a bad stamper so I thought it would be a good idea to sort out a few and put them directly in my kit to remind me to use them. I again followed the nature theme and chose some leaves and butterflies. 

Now I had matched the original kits pretty much item for item so it was time to see if there was anything missing. In the end, all I added in were a few more twines and a roll of washi tape as well as pulling out two Cricut cartridges to remind me to use them if possible.

I might, at this point, drag out some flowers, bling, ribbons or anything else which catches my eye when trawling my stash but not this time around. Again, it's important to me to include stash that is newer and older. I love to see my older stuff getting used up - I'm sure you do too.


6. Here is my kit all laid out willy nilly over my desk. I try to get a feel for if it's too big, too small, if anything is missing or if this is it. This was it! I move fast and make decisions quickly. It's not my aim to second guess myself and this whole process takes about 30 to 45 minutes. Taking the photos with the set up often takes longer! :-)


7. So then I took a nice photo of it!


8. Last but not least, I always reserve the right to add things in throughout the month as and when the need or fancy desires! And as I'm making up a layout using the kit, if I reach for something else to use with it, that often gets thrown in and stays there for the rest of the month - such as alphas, journalling spots or bling. This month, I've added in a mini alpha and some paper dolls I came across. Mists, inks and paints are considered to be "free" items to be used as and when and I often find myself adding in extra sheets of cardstock and using up vast quantities of string that were not in the kit.

Don't forget, there are NO rules! This is your kit and you can make up your own way of making and using it! :-)

Does this help? I hope that if you've been sitting on the sidelines not knowing where to start, this has given you some idea of my process and that it might help you to grab a piece of paper or cardstock as the basis of your next Counterfeit kit.

Let me know if you do!
Tuesday 15 May 2012

Counterfeit meets hats

Counterfeit mini-challenge #1 is up and this time around, we are asked to be inspired by a selection of the most gorgeous hats!

Do you love hats? I do. I wish we still lived in an age when hat wearing was normal for special occasions and not just something for weddings. I can't remember the last time I got to wear one. *sigh*

I looked through all the hats and chose this photo as the one I wanted to use for inspiration although any of them would have worked - each of the pictures had something so appealing to it.


I really liked the pearls, the vintage looking colours, the twisted layers and the soft look to all those flowers and fabrics.

Grabbing my May kit, Whispers, I took out cardstock and the tissue paper I'd included and then because I was tying this in with a LOAD prompt to use "trash" I took out my selection of Prima packaging that I've been collecting for some time and went to work with layers and distressing.


I decided to use the tissue (which incidentally comes from Starbucks so another "trash" find) to make a scrunched flower with pearls in the centre to mimic that wonderful creamy coffee hat there in the corner and while it looks nothing like the hat in the photo, I'm pleased with how it came out.


Which hat will you be inspired by? Don't forget to share.

Friday 11 May 2012

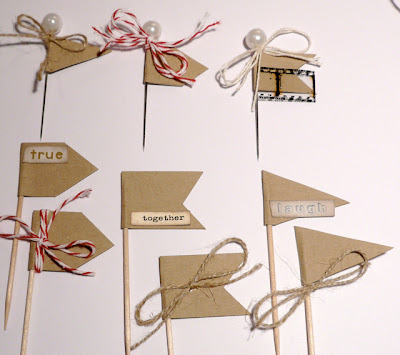
Pennant flags

After me saying that I never made my own embellishments, I have another mini-tutorial to share.

Although these little flags are SO easy to make, I'm sure you don't need me to tell you how to make them.

But just in case you've seen these little embellishments around and haven't thought about making them yourself I can assure you that they only take a couple of minutes and are super easy - just use the scraps you have lying around or even better, use up some bits from the papers you are using on your layout to make them match perfectly.

The ones in the SC kit that I counterfeited (see my kit here) were kraft flag pins from Maya Road so I decided just to grab a bit of kraft paper and have a go.

1. I cut a handful of strips - some 3" by 1" and some 2 1/2" by 3/4" and sort out a few floristry pins that I keep in my pin collection as well as some standard cocktail sticks.


2. I scored each of the strips down the middle because the card was quite stiff, but if you used normal paper, this might not be necessary.


3. I then used a wet glue (a glue stick would be best but I just didn't have any) and wrapped the card around the pin or the stick. I slid the card up to the pin head so that it popped out of the top but with the sticks, I kept the pointed end inside the fold. Just hold onto it for a few seconds to make sure it has stuck and sort of squeeze the card onto the pin/stick.


4. I just made a few cuts on the end of the flags - three of each design.


5. And then I decorated them up a bit with twine, string, words and a tiny bit of TH negative strip.

Cute!

Now I just have to use them!

Happy Friday everyone!

Thursday 10 May 2012

Doily envelopes

I'm not a big one for creating my own embellishments. In my Counterfeit kits, I tend to just try to match the type of embellishment rather than creating something - I'm lazy like that.

But this month's Versailles kit from Studio Calico (see my post all about my kit here) featured some really gorgeous little envelopes (and notecards) from Martha Stewart that I thought were adorable but didn't have anything like it. And so I decided to give it a go.

I made two different types so this is a photo heavy post as the principle is really quite simple but easier to show than to tell. And if I can make them, anyone can :-)

1. I started by making a real doily envelope using a rectangular cake doily


2. Cut the doily in half and turn it over so that the backside of the doily is facing you (usually the non-shiny side)


 3. Turn it so that it looks like a diamond to help you get the folds right


4. Take the bottom point first and bring it up to the edge of the cut part as shown - I needed to try this a few times before I realised the folding proportions.


 5. Then using the lines on your cutting mat as a guide, bring the right point to the middle of the first folded section - there will only be a very small overlap.


6. Again using the lines on the cutting mat to help you get straight folds, bring the remaining left hand point into the center. As you can see on mine, this point is the uncut corner of the doily making the centre of the envelope neat, tidy and all doily.


7. Now you can fold the top down to form the envelope flap


8. Apply a very thin line of glue on the underneath of the right hand folded section...


9. And also the left hand folded section ..


10. And carefully press them down on top of each other. Just pop your hand inside the envelope to make sure nothing sticks to the back inside. And there is a pretty little pocket for notes, journalling, confetti or just as decoration. Once I had the concept thought out, these little envelopes took me about 3 minutes each. I want to experiment with different doilies if I can track them down :-)


1. Then I decided to give a solid paper envelope a go. I started by finding a small standard envelope the size I wanted to copy. I carefully unglued it so that I could use this as a template. I had some heavy duty printing card (not as heavy as cardstock but much heavier than your usual printer paper) and used the template to cut out an envelope base. My card is a lovely crisp white but I think you could experiment with all sorts of different papers


2. Again using the template as a guide, I made sure the creases were scored


3. And folded everything up to check that the envelope looked ok


4. I then used my cropadile to punch some large and small holes around the closing flap. I did this really quick and it certainly isn't perfect but I think you could create some beautiful effects if you put more thought into it


5. I hand cut around the top row of holes to give it a scallop edge


6. And glued it together to give me my MS counterfeit envelope! I didn't worry about making cards but I suppose I could have made some pretty matching edged cards too


7. I also made a second one and lined the folding flap with cardstock so that the colour would show through the holes. This was far less successful but only because I was rushing!


Quick and easy. Why not give one or both of these ideas a go. I have already used one of my doily envelopes on a layout to house some personal journalling. I love the fact the cutwork gives the hint of what is inside.


Now, if I can do it, I know that you can!

LinkWithin

Related Posts Plugin for WordPress, Blogger...